
A few days ago, my HTU21D temperature and humidity sensor from Adafruit arrived in the mail. I’m planning to use it for a temperature and humidity display at home.

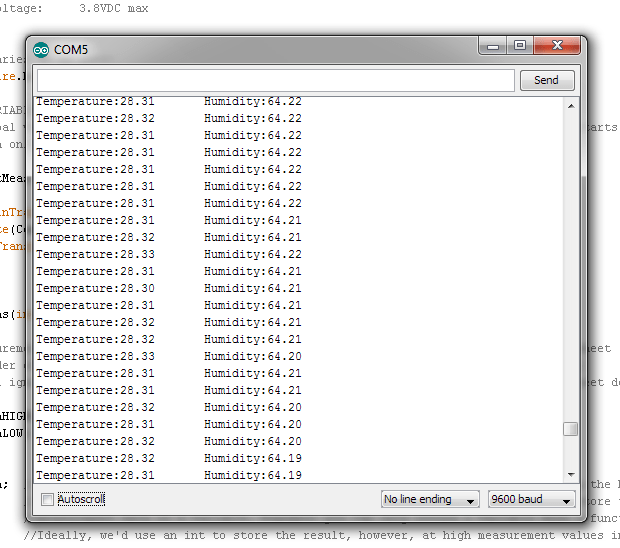
In one night I managed to start reading temperature and humidity measurements from the sensor using my own code that uses the Arduino Wire library. I wrote my own code instead of using the Adafruit HTU21D library to practice and learn interfacing a micro to an I2C device. All the measurement results are then output to the serial terminal.
From experience, analogue outputs are easier to faultfind with compared to a digital protocol but I was keen to learn something new and share the results. Digital protocols can be difficult to fix problematic software or hardware if you don’t have a protocol analyser. But once things are working, then tend to hum along forever.
My first impressions with the device were a bit frustrating, the datasheet for the device is not great (there are definately worse such as the WS2812B addressable LED module). References to figures don’t match and the device’s address detail is hidden in a paragraph instead of being clearly displayed. For reference, the HTU21D’s I2C address is 0x40. However, once I overcame these few hurdles, it seems like a decent, compact sensor.
I have not tried changing the device’s registers yet to allow me to change the measuring resolution but I don’t expect this to be too hard now.
I’ve included my code for you to use and improve. I’ll keep making updates to it as I continue to fiddle with the sensor. I’ll aim to make a proper tutorial on how to interface to this sensor soon.
//Code to read the temperature and humidty from a HTU21D temperature sensor
//Tim Hansen 12/2/15 - www.steelcityelectronics.com
//Protocol: I2C (TWI)
//Specs - Temperature: -40 to 125 degrees Celcius
// - Humidity: 0 to 100% relative humidity
// - Voltage: 3.8VDC max

//What libraries do we need?
#include <Wire.h> //The "Wire.h" library is required to use the I2C commands

//GLOBAL VARIABLES
//Avoid global variables where practical. Global variables consume SRAM as soon as the micro starts. Whereas a local variable declared inside
//a function only consumes SRAM when the function is called.

void RequestMeas(int Address, int CommandCode)
{
 Wire.beginTransmission(Address); // The HTU21D will respond to its address
 Wire.write(CommandCode); // request the measurement, ie temperature or humidity
 Wire.endTransmission();
 return;
}

long ReadMeas(int Address)
{
 //A measurement from the HTU21D is returned in 3 consecutive bytes. See page 11 of the datasheet
 //the order of returend data is: [DATA (Most Sig Byte)], [DATA (Least Sig Byte)], [Checksum]
 //We will ignore the checksum to save computation time and complexity. Page 14 of the datasheet details how to calculate the checksum

 byte DataHIGH; //The location to store the high measurement byte
 byte DataLOW; //The low measurement byte
 byte CRC; //If you want to compute the CRC feel free to do so.

 long Data; //The temporary memory location we are storing our data in as we receive it from the HTU21D
 //Each packet of data is only 8bits in length, but if we do a bit shift we can store the 2 packets of
 //measurement data in a variable. Remember you can only return 1 variable when a function finishes.
 //Ideally, we'd use an int to store the result, however, at high measurement values in 14bit mode, an int overflows.
 //To prevent overflow, we must use a single long (32bits).

 Wire.requestFrom(Address, 3); //We are requesting data from the HTU21D and there will be 3x bytes that must be read.
 while(Wire.available()) // Check for data from the HTU21D
 {
 DataHIGH = Wire.read(); // Read high byte
 DataLOW = Wire.read(); // Read low byte
 CRC = Wire.read(); // Read the CRC byte
 }

 //OK, so now we are going to 'pack' our 2x bytes of data measuremetns into a single int so only 1 variable is returned.
 //To do this, we will use the left bitshift operator '<<'. What this does is push all the bits across to the left.
 //FUN FACT: performing a left bit shift is equivalent to multiplication by 2 for each shift. The reverse is true for right
 //bitshift which is equivalent to dividing by 2. This is a far more efficient method to perform multiply or divide by 2.

 Data = DataHIGH; //The data sits in the low byte of 'int Data'.
 //Ie, Data = [00000000][00000000][00000000][8 bits of DataHIGH]
 Data = Data << 8; //Shift all the bits to the left for 8 bits. The old locations fill with zeros.
 //Ie, Data = [00000000][00000000][8 bits of DataHIGH][00000000]
 Data = Data + DataLOW; //Now simply add the low byte of data to the int.
 //Ie, Data = [00000000][00000000][8 bits of DataHIGH][8 bits of DataLOW]

 return Data; //return our measurement.
}

void setup()
{
 Wire.begin(); // join i2c bus (address optional for master)
 Serial.begin(9600); // start serial for output
}

void loop()
{
 //Set the address of the HTU21D. This detail is hidden at the bototm of page 10 of the datasheet.
 const int I2C_address = 0x40; // I2C write address. Note that 'const' has been declared. If you try to write to this variable
 // anywhere else in your code you'll get a compilation error. This prevents you from doing silly things.

 const int TempCode = 0xE3; // A temperature measurement is executed with this command code. See page 11 of datasheet.
 const int HumidCode = 0xE5; // A humidity measurement is executed with this command code. See page 11 of datasheet.

 long Temperature; //Perform our calculation using LONG to prevent overflow at high measuremetn values when using 14bit mode.
 long Humidity;

 float TemperatureFL; //Variable to store our final calculated temperature measurement
 float HumidityFL;

 delay(100); // a short delay to let everything stabilise

 while(true) // execute all the instructions in this loop forever
 {
 delay(10); //add a small delay to slow things down

 RequestMeas(I2C_address, TempCode); //Request the current temperature
 Temperature = ReadMeas(I2C_address); //read the result

 //We must now convert our temp measurement into an actual proper temperature value
 //According to page 15, the conversion equation is: Temp = -46.85 + 175.72 x TeampMeas / 2^16
 //Becasue the result will have decimal places in the result we must use a Float datatype.
 TemperatureFL = -46.85 + 175.72*(Temperature/pow(2, 16));

 delay(10); //add a small delay to slow things down

 RequestMeas(I2C_address, HumidCode); //Request the current humidity
 Humidity = ReadMeas(I2C_address); //read the result

 //We must now convert our humidity measurement into an actual proper humidity value
 //According to page 15, the conversion equation is: Humidity = 6 + 125 x TeampMeas / 2^16
 //Becasue the result will have decimal places in the result we must use a Float datatype.
 HumidityFL = -6 + 125*(Humidity/pow(2, 16));

 //All the calculations are complete, lets now display our values for temperature and humidity on the serial port.
 Serial.print("Temperature:");
 Serial.print(TemperatureFL);
 Serial.print("\t");
 Serial.print("Humidity:");
 Serial.println(HumidityFL);
 }

 return;
}
