
Can a Da Vinci 1.0 3D printer and XYZware successfully print Ninjaflex (TPE) flexible filament? Not sure. Probably. Very likely. Almost certainly.


This page is going to be a dynamic document as I work my way through the process of seeing if a Da Vinci printer is capable of printing objects using Ninjaflex.
Constraints:
- Can the printer’s stock firmware (1.1.J) be used?
- Can the stock printer software, XYZware, be used?
- Use of the stock extruder nozzle.
- Minimal hardware modifications to the printer.
Ninjaflex Properties
The recommended Ninjaflex print settings are:
- Extruder temperature: 210-225°C (410-437°F)
- Print bed temperature: 20-50°C (68-122°F)
- Print speed: 20mm/s
Fortunately, a Da Vinci printing ABS operates the extruder at 210°C which is right on the recommended extruder temp.
However, the default Da Vinci print bed temp for ABS is 90°C. It appears alternative slicer programs (Cura, Slic3r) can turn off the print bed, however, I want to continue to use XYZware.
Obstacles
Research on the topic yields people finding two of the following issues occurring which prevent successful use of Ninjaflex:
- Filament swells and jams in the extruder throat before it reaches the hotend
- Poor support of the filament through the drive gear and extruder throat and the filament tangles itself up
Objectives
With the obstacles identified and the required print settings known, the objectives are:
- Set the print bed temperature to 20°C without having to use an alternative slicer program. Success.
- Prevent swelling of the filament in the extruder throat. Success.
- Support the filament between the drive gear and extruder throat.
PendingImproving.
Progress Summary
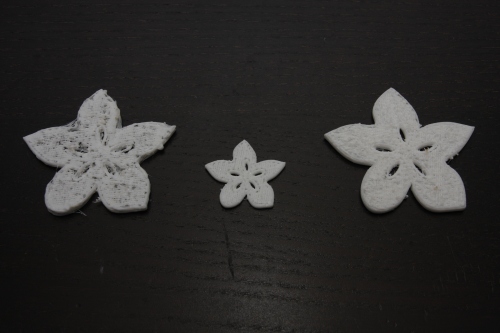
3/6/15
Some big improvements in printing performance have been made!


Two prints with substantially better print quality have been made and each successful print is improving. The main progress has been a result of using Slic3r and its ability to control more printing parameters. A full write up of the successful settings will follow soon.
Repeatability and reliability of print quality still requires improvements. Printing success requires a very diligent setup.
12/5/15
Details on the performance of different filament guides has been added.
A custom heatshrink filament guide was trialed with some limited success. The best performance so far has been with a 3D printed filament guide.
7/4/15
Very good progress was made today. Three test prints of varying quality were all completely printed. A different method of machining a filament guide that I’ve had some limited success with was used today. Additionally, installing the filament guide using a different method was used. Unfortunately this method of installation is much slower, but it allows for a closer fit. However, the biggest surprise was, that stretching the filament as it feeds into the drive gear prevent any tangles of the filament in the drive mechanism.
I’ll post details of the filament guide and installation very soon. However, checkout the video below showing that it is very likely that flexible filaments can be printed with a cheap XYZprinting Da Vinci 1.0 printer.
31/3/15
So far, there has been some limited success printing Ninjaflex. Each print begins well with the shells and outlines laid down well. As the infill progresses, the volume of filament printed decreases until the filament tangles around the drive gear or it appears that the drive gear begins to slip.

The apparent slipping of the filament may be due to how I’m supporting the filament straight after the drive gear. The filament support may be obstructing the idler bearing and hence the idler is not completely clamping the filament. However this requires more investigation.
For the doubters, check out the video of the above print being peeled off the print bed.
Objective 1: Set Print Bed to 20°C
Status: Solved
Previous investigations identified that the print bed temperature is measured with a thermistor.
A thermistor’s resistance varies as its temperature changes and the Da Vinci’s print bed thermistor’s resistance vs temperature profile has been mapped already.

To begin printing, the print bed temperature must reach 90°C. Therefore, it stands to reason, that a fixed value resistor can be used to simulate the thermistor.
If a resistor whose value equates to more than 90°C is used, the printer will think that the print bed is at the correct temperature and will not power the heat bed. If the heat bed is not powered, then it will remain at room temperature which is within the recommended range of 20-50°C.
Disconnecting the print bed thermistor plug and inserting a resistor of 47k Ohms makes the printer think the print bed is at 97°C.

To confirm that the print bed did not heat up, an object was sent to the printer and the printer began its routine. The printer showed the print bed sitting at 97°C and the extruder slowly increased to 209°C. Touching the print bed was no problem at all because it remained at room temperature and it had not heated at all. Once the extruder reached 209°C, printing began as it would normally.
Bypassing the print bed thermistor with a resistor of 47k Ohms allows the print bed to remain at room temperature.
Objective 2: Prevent Swelling and Jamming
Status: Solved
Measuring Extruder Throat Temperature
There seems to be a lot of suggestion that PLA and Ninjaflex begin to soften and jam in the top of the extruder before the filament reaches the hotend. The reason for this is blame don the extruder being a poor design or the filament having a lower melting temperature than ABS.
To understand how hot the throat of the extuder gets, some modifications were made to the extruder using a ring lug, some thermal paste and a k-type thermocouple.

Making the sensor is very straightforward. Take a ring lug with a ring diameter of 6mm so it can slide down the threaded extruder shaft. A red lug suited my thermocouple because the thermocouple bead is about the same diameter as the red lug (a red lug is suitable of 1.5mmsq cable).

Check to see if the thermocouple comfortably fits inside the lug. Some of the heatshrink had to be trimmed back so the welded bead sat neatly inside the very end of the lug.
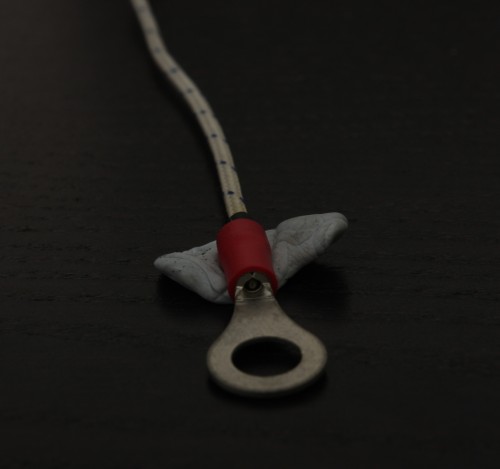
To aid heat transfer, I thought it would be a good idea to dip the thermocouple bead in some heat transfer paste. (I really don;t know if this has helped in any way.)

Next insert the thermocouple back into the ring lug. Carefully crimp the lug. I didn’t completely crimp the lug because I was concerned that I may break the welded tip of the thermocouple and it was the only thermocouple I had at the time. (To release the ratchet, there is a safety release on lug crimpers. Folklore says that the safety release was only installed after people reported that they inserted their small finger in the position of a lug and started closing the crimpers to see what would happen.)

The finished product.

Once, you’ve made your new temperature sensor, simply remove the 6mm nut, slide the ring lug down to the aluminium block and replace the 6mm nut. (I put some thermal paste on the ring lug to aid heat transfer from the aluminium block and 6mm nut into the ring lug. )
Extruder Throat Temperature Measurements
Check back soon.
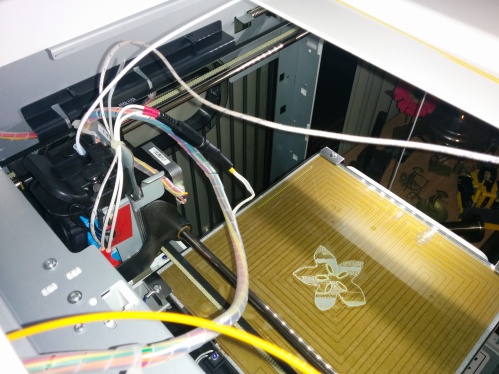
Objective 3: Support Filament after Drive Gear
Status: Limited Increasing Success
Why Filament Requires Support in the Extruder
The following video demonstrates why a filament guide is required to support the flexible filament as it passes from the drive gear and into the throat of the extruder. Within seconds, the flexible filament buckles and becomes tangled.
Once the filament is tangled, printing has to stop and the tangled filament removed.
Filament Support Guides
3D Printed Filament Guide – Trial 1
Initially, the Da Vinci filament support guide by moridev was used with only limited success. Installing the extruder back in the print head carriage was difficult because the filament guide would foul on the idler and drive gear. To get the extruder back into the print head carriage, the edges of filament guide had to be chamfered. However, this compromised the strength of the filament guide and the filament managed to still tangle in the extruder.
Heat Shrink Filament Guide
Due to initial problems with a 3D printed filament guide, a simpler guide was made simply using heatshrink. A short length of 6mm heatshrink was placed over the extruder throat and heated. The heatshrink gripped around the threaded throat. Then the exposed heatshrink reduced in size to approximately 2mm in diameter.

Print time duration increased. However, the filament would manage to force its way through the small gap between the heatshrink and the guide wheels.
Modifying the heatshrink guide so that it was longer in length did not improve performance. The filament still managed to force itself out of the top of the heatshrink filament guide.
3D Printed Filament Guide – Trial 2
Attention returned to the 3D printed filament guide on Thingiverse.
To minimise any gaps for the filament to escape through, each of the two faces of the guide were sanded into shape. This process involves some trial and error to make sure the filament guide sits within the two guide wheels as best as possible.
Next, the method of installation was changed. The 6mm nut that can be seen below the orange filament guide was loosened. Then the extruder throat was gently pulled downwards. The filament guide was positioned on top of the extruder throat and the extruder throat pushed back upwards. Then, the 6mm nut was tightened up.
Making adjustments to the extruder head required the print bed height to be re-adjusted. This was done by stopping the printer just as a print began and then using a 0.23mm feeler gauge to adjust the three bed adjustment nuts until there was 0.23mm of clearance between the print nozzle and print bed.

Print times have increased to several minutes. However, the filament now appears to stall inside the extruder. The filament is now unable to escape however it stops feeding and the drive gear appears to be slipping on the filament. There is no evidence of excessive clogging becuase when the filament is pulled out there is no large blob of melted filament.
Objective 4: Prevent Filament Stalling in Extruder
More to come.

amazing info and very helpful!
It looks like you have been modifying it physically, I took a different approach through software and have had very good success with Slic3r and Cura. they both work when editing temps for the bed and extruder. for cooling i installed a fan shroud from thingiverse that helps a lot, some people have found that re-positioning the fan directly in front of the stock heat sink actually helps a ton.
LikeLike
Hey Jason thanks for the feedback.
Yes, I have made some physical mods, but I’d like to see which mods are necessary to print alternative materials.
Do you have any recommendations on how to get started using Slic3r and Cura with a Da Vinci. Did you have to reflash the firmware?
LikeLike
in my experiments I could never get the Filament guide to really have a good fit. Try printing a a higher temperature. in my testing I found that having a hotter extruder made the filament feed better and not get stuck in as you explained.
I print at 250c and it seems to last a few more minutes
LikeLike
the material doesnt swell. The heat creeps up the barrel and heats up the filament in the barrel above its Tg temp. When the extruder goes to feed material down to push material out the nozzle it is easier for the filament to smoosh into a molten blob in the barrel that to push out the nozzle. by adding a heat sink to the barrel you can prevent the heat creeping up the barrel
check out this link for more details and pic
http://www.thingiverse.com/thing:794988
LikeLike
Great writeup. I was wondering if that is a different drive gear than what came with the Davinci? If so could you share what you installed?
LikeLike
Thanks Christopher. No it is the original drive train that came with my printer.
LikeLike